
Decorating with dried flower stems is something the frugal part of me gets excited about.
We have a Curly Willow Tree my late grandmother Pauline "rooted" as a gift to me, from her own tree. The sapling is now a full grown tree. The branches dry to a perfectly twisted shape that make interesting fall accents around our home. Several years I made a Thankful Tree by arranging the branches in an old green jar. Each family member taped a leaf cutout with something they were thankful for to the curling tendrils. We have used these branches at our live vendor events as decoration as well as displaying Wendy&Co products. My grandmother Pauline would be SO PROUD!

The curly willow tree was an inspiration to look for other plants that could serve double duty, looking great in the yard as well as inside the home. Enter the Phantom Hydrangea. The most beautiful hydrangea bush ever (in my humble opinion), and well suited for our southern North Carolina weather. The gigantic blooms are white to green with pink edges...and some are bigger than my head!

What to do with such beautiful blooms?
Preserve them of course!
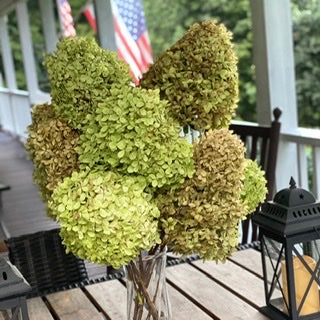
Especially when they can look like this!

The flowers grow on new wood only, so all the more reason to cut these blooms and spread their beauty far and wide.
It was trial and error that led to this hydrangea drying technique..well, mostly error! I basically forgot to add water to the stems I had arranged in our bay window. Here is the result.

I have had this dried arrangement for over 8 years.
Disclaimer- I am absolutely no florist, or botanist, or flower expert of any kind. I am only sharing my own personal flower drying experience with you.
Here are a few tips and tricks for drying hydrangea stems.
- Arrange the flower stems the way you want them to look when they are dry. Either together in a vase or place them individually in vases or containers to dry and be arranged later. Here is our current drying arrangement.

- Fill more than half of the container with water.
- Now, just leave them alone. And watch them dry to a warm fall camel color.
- TIPS - If the flowers are drying too quickly they will shrivel up. Add more water to your container. If the flowers are drying open and pretty (just like they look when in bloom), do not add more water. Simply allow the container to go dry naturally as the plant absorbs the water. That’s the only tricky part - watching them, to see if they need more water - to dry open and beautiful.
- Tips for drying outside – anchor the container, as it will get top heavy as the water is absorbed. Don’t dry them in the sun. A shaded covered area is best.
- Tips for drying inside– Remember these are live plants, so check the flowers for little insects - grasshoppers or little green spiders...or leave them as part of your Halloween Décor! :)

Plant goals - American Bittersweet, a wild climbing vine with yellow-orange berries, has been a long time favorite of mine. I have purchased dried vines and even imitation berry vines. But to raise and dry our own cheery vine would be such a satisfying experience. A close second on my with list is the Pussy Willow with its soft, furry catkins. I get the warm fuzzies just thinking about it! So many plants, so little time.
What plants have you had success with drying and using to decorate your home?
~Wendy